The Missions tab displays a meaningful overview of the missions you get each time you click [ Request Missions ] on the AO mission terminal, without actually having to look inside each mission description.
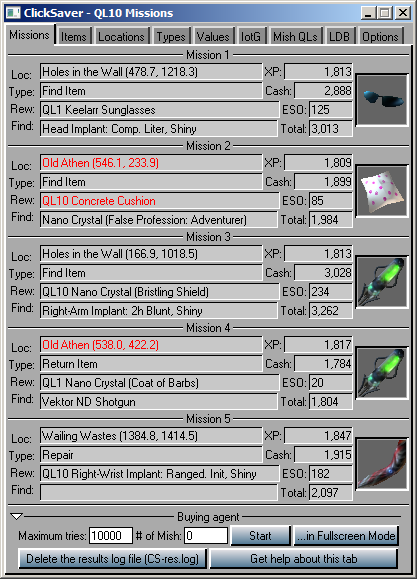
It can highlight in red the items, locations, mission types and some values of your interest, if you have setup the highlighting options in the corresponding tabs.
This overview is also available when you’re auto-rolling and ClickSaver finds a mission that matches your search criteria.
Cash, ESO and Total
Cash indicates the cash reward you get when you complete the mission. In team missions, this is the cash reward that each team member gets, if they’re inside the mission building when the mission is completed.
The ESO and Total fields are explained in the Values Tab page.
Buying Agent
The [ Start ] button makes ClickSaver start searching for missions that match your search criteria, which is defined in the Items, Locations, Types and/or Values tabs. It will also show the “Buying agent is running…” window, that displays the progress of your rolling session.
Keep in mind that, if your search criteria includes more than one of the 5 match types (item, location, mission type, single value and total value), ALL of the enabled match types must be met in the same mission for ClickSaver to consider it as fitting.
If you play in fullscreen mode, you should use the [ …in Fullscreen Mode ] button instead to prepare ClickSaver for rolling. It will wait for you to switch to the AO client, and then you should click once on [ Request Missions ].
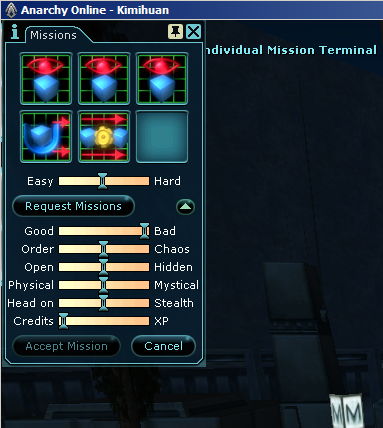
Before you hit any of those buttons, you have to make sure that the AO Mission terminal dialog is open and aligned to the top left corner of your AO client, like this:
In the Maximum tries box, you put the number of rolls you want to try before giving up.
In the # of Mish box, you put the number of missions you want ClickSaver to auto-accept. Read more about mission auto-accepting here.
Results log file: CS-res.log
ClickSaver logs all relevant data about found missions in CS-res.log. For instance, if you were searching for an item with “conc cush” as match string, after finding it, you would get something like this in CS-res.log:
*** Found wanted mission, QL10 #3
loc 540: 431.4 479.1 Old Athen
/waypoint 431.4 479.1 540
find Nano Crystal (Enhanced First Aid)
*** item match string: conc cush
*** reward QL10 Concrete Cushion (DB Id 125456/125456)
Done 468/9532 QL10 rolls - Found wanted mission
The [ Delete the results log file (CS-res.log) ] button deletes this file.
Icons
If you’re rolling solo missions, the icon for the reward item for each mission is also shown. If you’re rolling team missions, the icon for the reward item is shown sometimes, only when the mission has just one reward.
These icons show only if your local database contains them.
If you don’t care about icons being shown, and prefer to have more space for the item names, you can download an iconless local database here. Here’s the tab layout without icons:
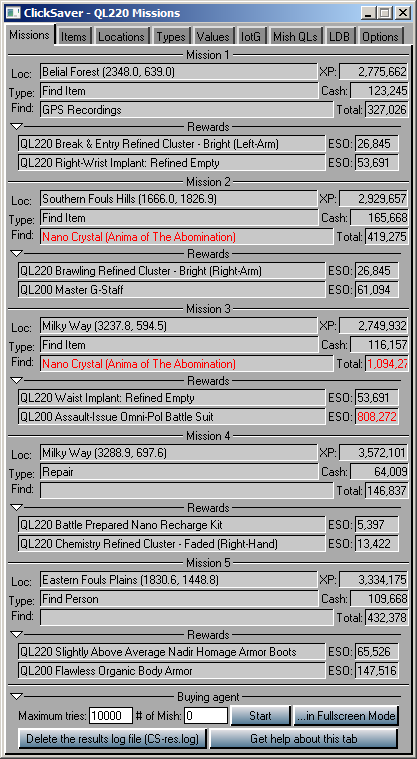
Rolling in team
When the option Auto expand team missions is checked, all rewards for all missions will be shown. Otherwise, when you want to see a mission’s rewards, you have to click on the white triangle at the left of the “Rewards” title for the mission you want.
Here’s a sample for a team of 2, with team missions auto expanded:
(Updated 5-Sep-2015)