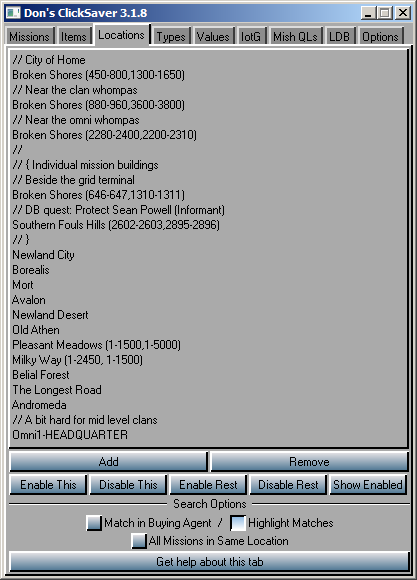
The Locations tab allows you to add, edit and remove Location Match Strings (LMSs from now on), and do other operations on them.
You can edit a LMS by double-clicking on it.
The [ Add ] button adds a LMS at the end of the list.
The [ Remove ] button deletes the selected LMS.
The [ Disable This ] button disables the selected LMS, by prefixing it with an asterisk (*).
The [ Enable This ] button enables the selected LMS, in case it had been previously disabled by an asterisk (*) prefix.
The [ Disable Rest ] button disables all LMSs except the selected one, by prefixing them with an asterisk (*). This is useful when you want to roll only in the selected location.
The [ Enable Rest ] button enables all LMSs except the selected one, by removing an asterisk (*) prefix from them.
The [ Show Enabled ] button shows all the currently enabled LMSs.
If Highlight Matches is enabled, locations in the Missions Tab will be higlighted in red if they match any of the LMSs in this tab’s list.
If Match in Buying Agent is enabled, ClickSaver considers that there is a Location Match when any of the locations in the last rolled mission set matches any of the LMSs in this tab’s list. In this case, and if Location Match is the only active match type (that is, item match, mission type match, etc are disabled), ClickSaver considers that a fitting mission has been found.
The All Missions In Same Location option is described in Multiple Mission Auto-Accepting.
Location Match String (LMS) rules
- All matching is case-insensitive.
- “literal text” is ok.
- Negative tokens and literal text can be used to exclude some locations: -token and -“literal text”
For a match to happen between a LMS and a location,
- All of the LMS (positive) tokens and “literal text” must be present in the location name.
- None of the LMS negative tokens and “literal text” can be present in the location name.
- If the LMS defines a coordinate rectangle, the location coordinates must be within that rectangle.
Some LMS/location matching examples to clarify:
athen -shire will match on ‘Old Athen’ and ‘West Athens’ but not on ‘Athen Shire’
Broken Shores will match any mission in that playfield.
Broken Shores (450-800,1300-1650) will match any mission within the city of Home, which is in the Broken Shores playfield, delimited by the coords 450-800 (west to east) and 1300-1650 (south to north).
Even More Rules
- Lines prefixed with // are considered remarks.
- LMSs prefixed with * are considered temporarily disabled. This prefix can appear by hitting one of the [Disable] buttons, and disappear by hitting one of the [Enable] buttons. It can also be manually edited.
Editing the LMS list with an external editor
If you have a lot of LMS editing to do, and you’re expert enough to follow these instructions, you can use them instead of the Locations Tab edition controls:
- Close ClickSaver.
- Just in case, backup the file LastSettings.cs
- Open LastSettings.cs with a text editor, i.e. Notepad.
- Locate the line beginning with ::LocWatch::
- The LMS list follows that line. Feel free to edit it as you want.
- Save the file (as text) and close it.
- Open ClickSaver. You should find the updated LMS list in the Locations tab.
(Updated 31-Dec-2015)